
Your workspace contains your team's content, people, sources, and settings. These examples use the fictional Northstar Learning Co workspace.
1. Confirm the workspace
Open the workspace menu at the bottom of the sidebar. Check the workspace name and your role before creating content. Select the workspace where the work belongs.
For people with Workspace Assistant access, the app logo opens the Honen Agent home page. Learners have their own Home view with learning work and progress.
2. Start with a request or open a tool
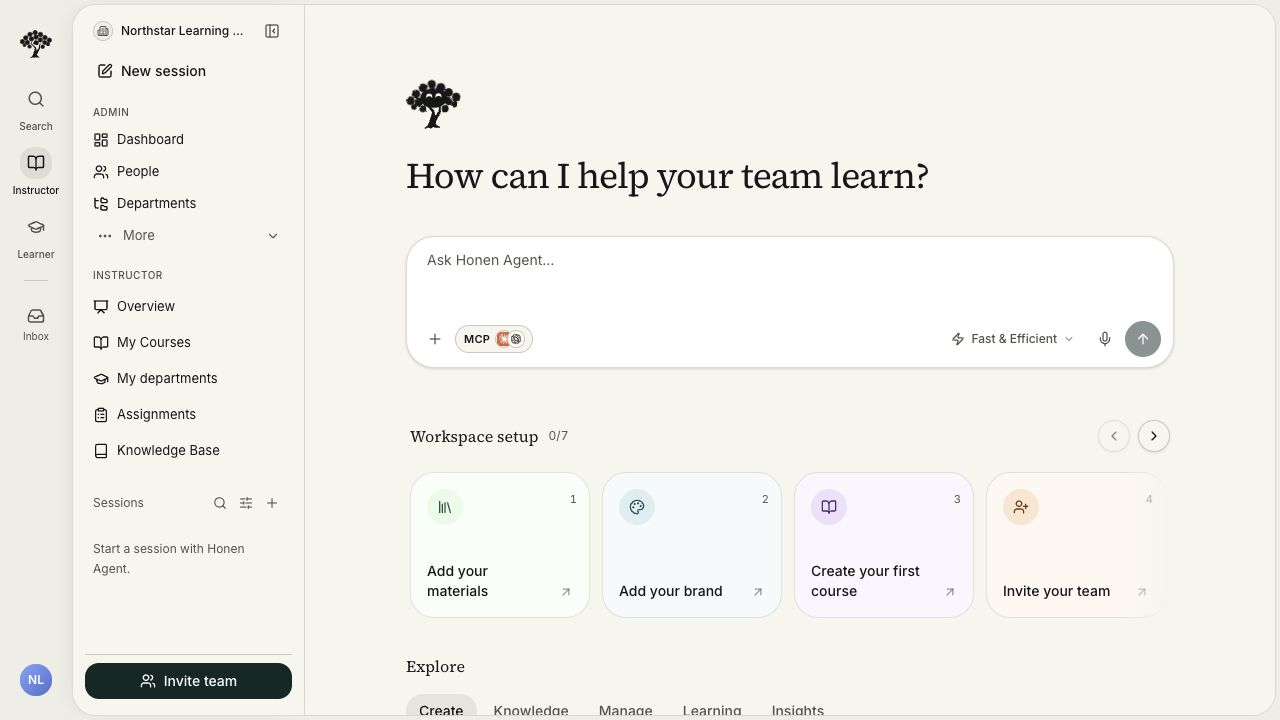
On Home, describe the result you need or select an idea under Explore. You can create learning content, find a source-backed answer, organize people, plan learning, or inspect results. The available suggestions depend on your permissions.
For example:
Create a short onboarding course from our Customer Onboarding Checklist. Include a reading and a practice quiz. Leave it unpublished for review.
The conversation stays beside the relevant editor or management page as the agent works. You can use the page controls for manual changes.
| Area | Use it for |
|---|---|
| Honen Agent | Ask a question or request a workspace task. |
| Knowledge Base | Find, organize, and maintain approved source documents. |
| Organization | Manage content, people, groups, settings, Agents, and integrations. |
| Agents | Configure custom assistants, task runs, Evals, and automations. |
| Analytics | Review learning activity and results. |
| Instructor view | Open the groups, content, and assignments you manage. |
| Learner view | Open your courses, assignments, and learning progress. |
| Explore | Browse learning content available to you. |
An administrator can open Organization → Agents to create the first Agent. After creation, Agents also appears in the workspace navigation. Sites follows the same pattern. Organization labels can change with your workspace terminology, such as Company or School. Groups can appear as Departments or Classes.
Use the left rail to select a view. Choose Expand navigation when you need the full navigation panel. Use More to reveal additional tools where offered.
3. Search for a page or item
Select Search in the header or navigation. Enter a page, course, or content name, then choose a result. For source documents, use Search documents inside Knowledge Base.
For example, open Knowledge Base, search for “Customer,” and select Customer Onboarding Checklist. Check the title and folder after opening it.
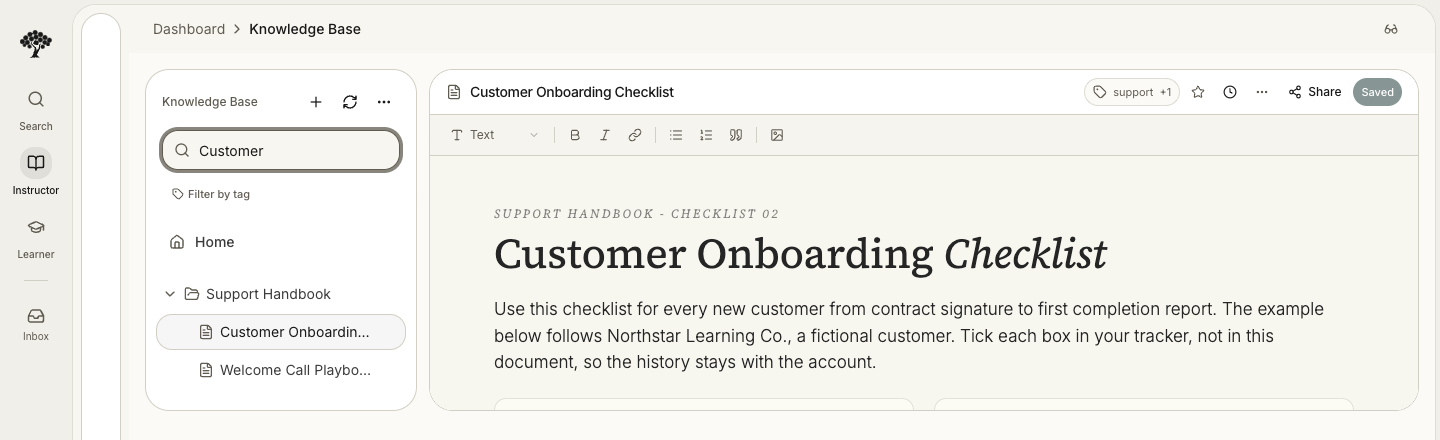
Search results show items available to your current role and workspace. Course covers and other identifying images help you recognize the correct item.
4. Continue an earlier task
Use Sessions in the navigation panel to reopen a conversation. Search sessions or filter them to Today or Last 7 days when needed. Choose New session for a separate task.
The selected session can reopen the page and supported filters associated with its work. Background sessions do not move your current page. Save or discard manual edits before changing pages.
Use Pick up where you left off on Home to reopen recent editable content. Changed fields can briefly highlight after an agent action. The highlight does not save a second time.
Read an Agent conversation
After you send a message, it moves near the top. The reply grows below it. Scroll, select text, or use the keyboard to pause automatic scrolling. Select Jump to latest to return to the reply and follow new content.
Use Find in conversation to search message text. Press Enter to open a match. Use Jump to a turn to return to an earlier question. Hover over a message to find Copy message link. Keyboard users can reach this control with Tab.
When you reopen a conversation in the same browser tab, it returns to your saved reading position. If that position is unavailable, it opens near the last question.
5. Set up the workspace
The Workspace setup cards on Home match your role and permissions. Select a card to continue the conversation beside its page. For example, add approved material, create groups, or prepare a reusable course template.
Review the saved result before treating the step as complete. A setup step completes when its saved result meets the requirement; opening the card alone does not complete it. Removing the related saved items can make a step incomplete again.
If an option is missing
Confirm the workspace and selected view first. Your administrator can check the role, plan, and item access required for the task.