
Use Organization to manage your team, and My groups to work with a particular cohort. These examples use the fictional Northstar Learning Co. workspace.
Workspace labels depend on its type and administrator settings. Use the matching term in your workspace.
| Default term | Business workspace | Educational workspace |
|---|---|---|
| Organization | Company | School |
| Members | Employees | Students |
| Groups | Departments | Departments |
| Subgroups | Teams | Classes |
| Curricula | Programs | Curricula |
Administrators can customize these labels in Workspace Settings. Higher education workspaces can use different school and course labels.
Join an existing organization
Choose Join an existing organization during signup. Paste the invitation link or nine-digit code from your email. Sign in with the same email address that received the invitation. A different account cannot use an email invitation. When you enter a nine-digit code, you must verify the matching email address. The button in a new invitation email also confirms access to that invitation. It shows the organization and keeps the invitation open through signup. You must still use the matching email address. New email invitations normally expire after seven days. Ask the instructor for another invitation if yours expires. Existing invitation links continue to work. You can also enter a workspace that you already belong to.
1. Create a group
- Open Departments in the business workspace navigation, or Organization → Manage Groups where that terminology is used.
- Choose Create Department (or Create Group).
- Enter a descriptive name, such as Product Onboarding.
- Add an optional description explaining who belongs in the group.
- Choose Create. The group appears in the list; open its name to continue.
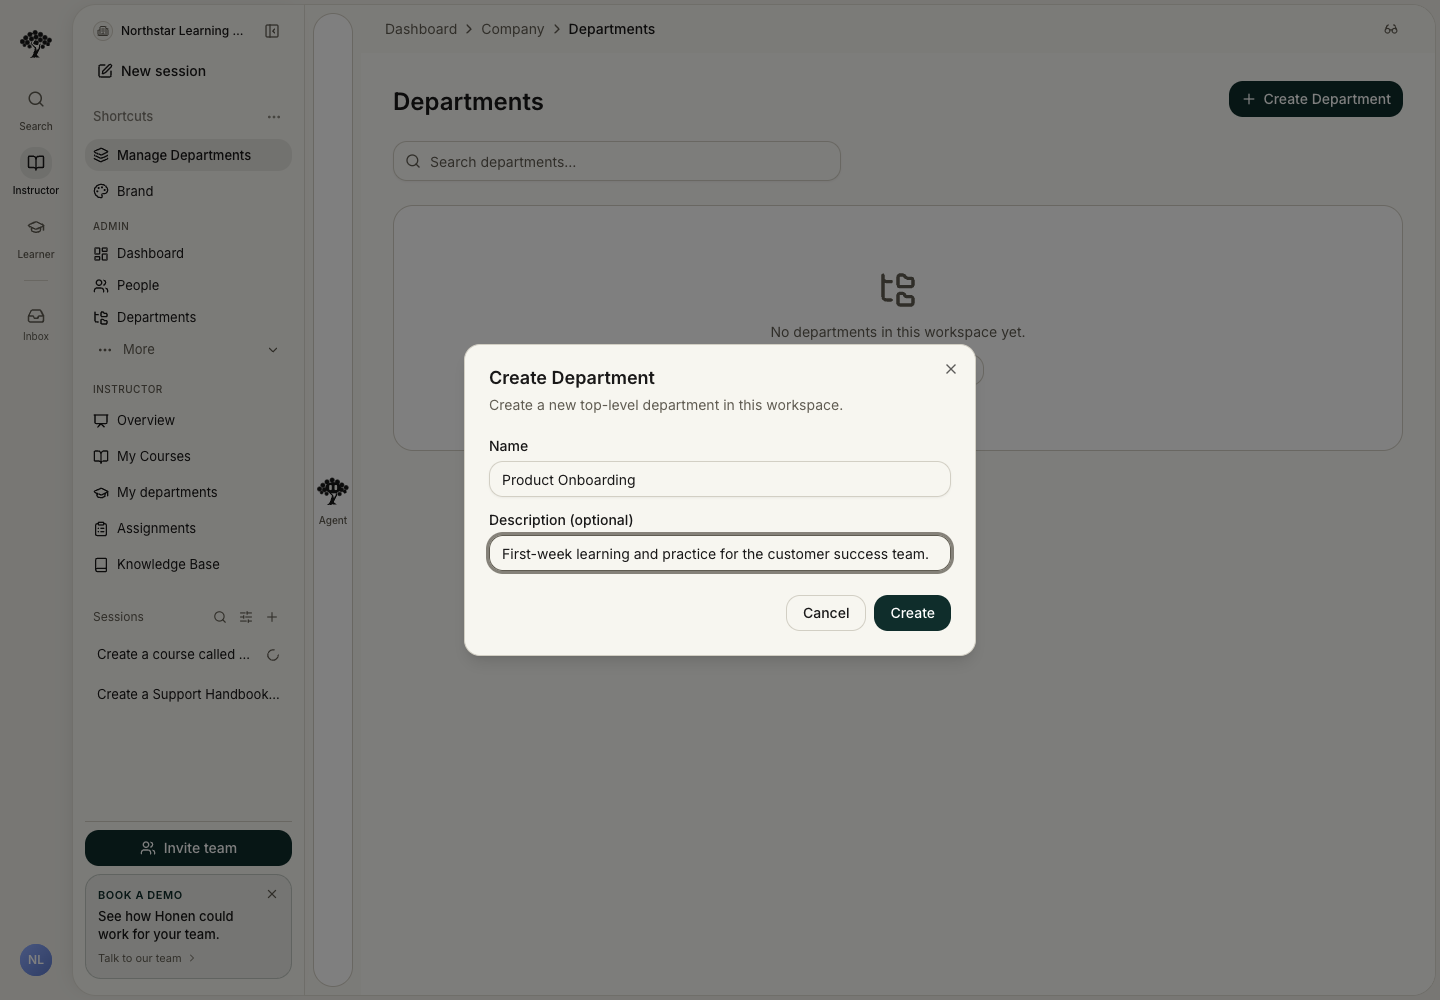
The group creator is added automatically, ready to organize the cohort.
2. Organize the group's learning
- Open the group and use Home to arrange its learning home page.
- Use Courses for course access and Assignments for work with a completion requirement.
- Open Curricula → Add curricula to select a published learning path.
- Search for the curriculum and add the intended result.
- Choose Done after reviewing the selected content.
Publish the curriculum before selecting it for a group. This keeps the group’s learning path focused on content ready for delivery.
For the complete workflow, including subgroups, membership changes, catalog access, home-page sections, and group settings, follow Create and manage groups.
3. Prepare a member invitation
- Open People in the business workspace navigation, or Organization → Manage Members where that terminology is used.
- Choose Add Employee → Add one employee in a business workspace, or Add Member → Add one member. The multiple-person option opens the bulk invitation path.
- Enter the person's email. First name, last name, title, and tags are optional.
- Choose the appropriate Role and optional Assign to Group.
- Review the email, group, role, and the seat-cost notice, then choose Add & Send Invite when ready.
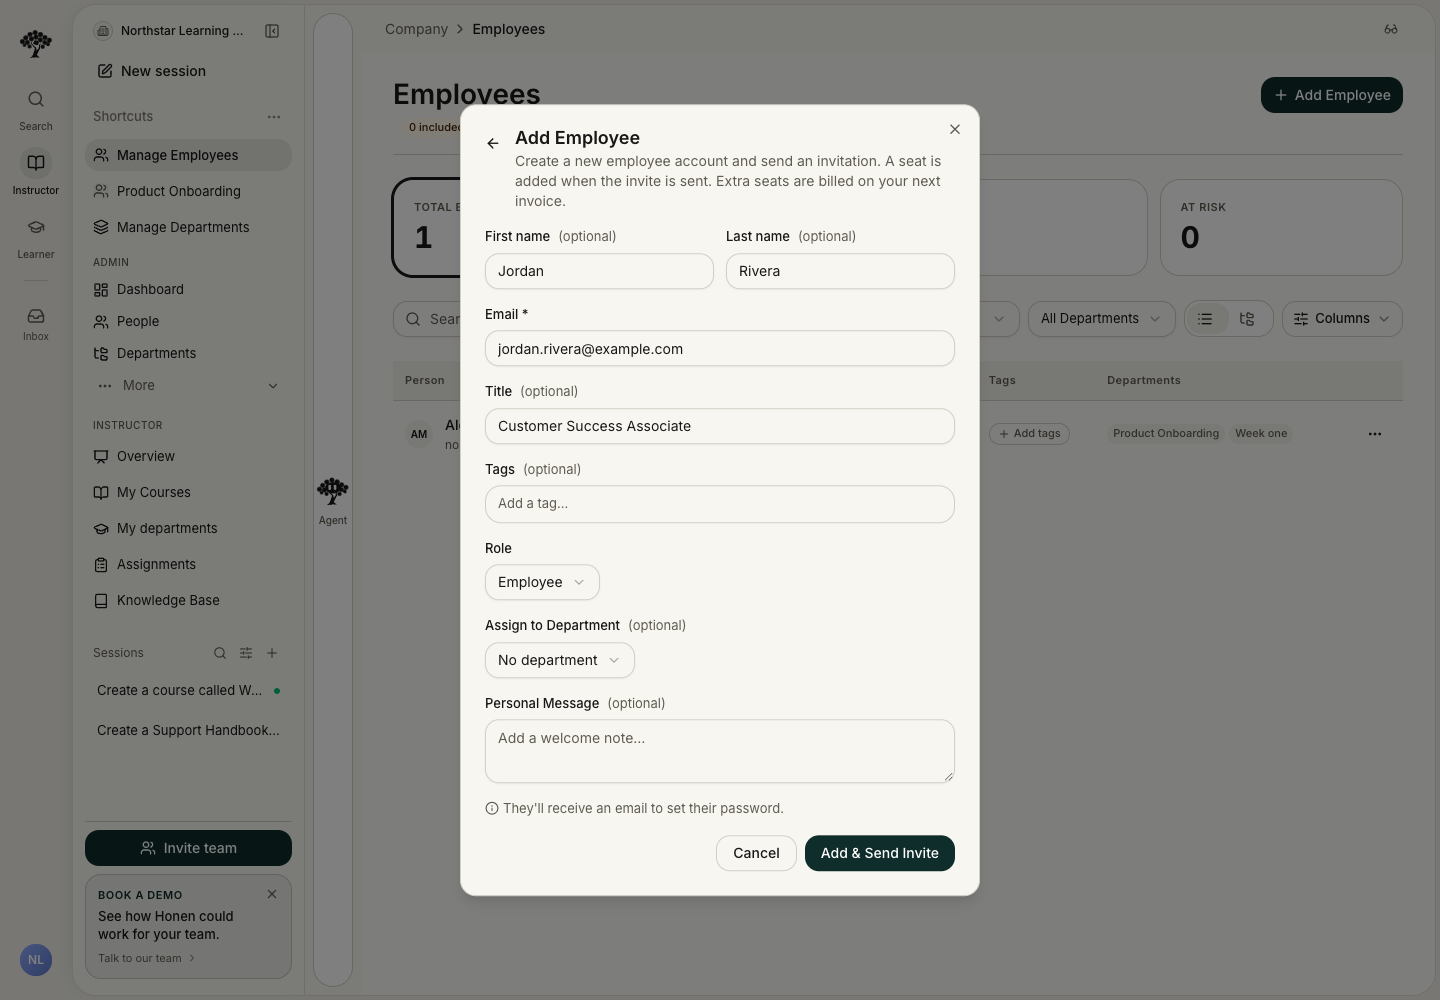
Add & Send Invite emails the invitation immediately. The person appears under pending invitations until they accept. Review the displayed seat information before sending.
Invite a cohort with a CSV
- Open Add Member → Add multiple members.
- Add a row for each person, or choose Import CSV to load your roster.
- Review each imported email, name, role, and group before sending.
- Choose Send invites. Track acceptance in the Members page’s pending invitations.
Choose Member for learners, Instructor for people creating and assigning learning, or Admin for workspace administration. Review your workspace’s role definitions when it uses custom roles.
You can also ask the Workspace Assistant to invite a person or cohort. Include the exact email addresses, role, and group, for example: Invite [email address] as a Member of the Product onboarding group. Replace [email address] with the intended recipient's address. Sending this request can send invitations, so use the recipients and role you intend.
4. Find and maintain members
The Members page provides a text search plus All Roles, All Status, and All Groups filters. Use List or Tree to change the arrangement and Columns to choose visible fields. Open a person's name for their detail page. On roster means the person belongs to the workspace. It does not mean they used the workspace recently.
If you have View analytics permission, use Active this month to find members with recorded workspace activity. The activity column shows their latest recorded event this month. No recorded activity means no events were found for that person in the displayed period. Unavailable means activity data could not be loaded.
The activity period starts on the first day of the calendar month in America/New_York, matching the usage reports. Invitations remain separate from activity. Learners on the roster still count toward learner capacity, even when they have no recorded activity.
The plan summary shows the billing model and workspace capacity. Billing managers can also see AI credits used, remaining credits, prepaid credits, and the reset date. The AI billing period can differ from the activity calendar month. Open Billing for payment and contract details.
The full workspace directory requires Manage invites permission at the workspace level, in both the People page and Workspace Assistant. Access to an individual group roster follows that group's permissions and membership.
Deactivating a member requires Remove users permission and authority over that person's workspace roles. If your role is insufficient, the action stays visible but disabled. Hover over it or focus it with the keyboard to read the explanation. Transfer ownership before removing an owner. Assign another admin before removing the last admin. Deactivation retains learning history; remove LMS-managed members through their LMS.
For a group's name or description, open Group settings, edit the fields, and choose Save Changes. Workspace roles and group roles can have different scopes; see Access, roles, and safe publishing.
For AI credits, invoices, and seat charges, see How billing works.
Tips for a smooth setup
- Workspace and role: confirm the intended workspace and use a role with the management permissions you need.
- Ready-to-deliver curricula: publish the learning path in the intended workspace before adding it to a group.
- Invitation follow-up: review pending status and the invitation email before sending another invitation.
Build a curriculum and certificate before adding a learning path, or create an assignment for a particular course.
Messages and group announcements
Use Inbox to open Messages. Group announcements also appear on the group's home page. Administrators control messaging in Workspace Settings → Messages or the Messages card in Integrations.
- Open the Messages configuration page.
- Enable the conversation types and file sharing your organization needs.
- Select Save changes and check the saved settings.
- Grant the required sending permissions through Roles & Permissions.
Workspaces without saved settings allow announcements only. Private conversations require current membership and participation, including for administrators. To begin a permitted conversation, open Messages and select New message. Choose the recipients, write the message, and review it before sending. Check that your message appears in the intended conversation.
For Agent updates, the organization must enable Agent messages and the sender must have permission. Each recipient must also enable Agent messages in Message settings. Ask Honen Agent explicitly to send the update to the intended recipients. Agent updates are read-only messages. They do not expose the Agent's private conversation.