
A guided chat has no generated content. You choose what it teaches, and the course tutor holds the conversation live with each learner.
Choose what it teaches
- Open the course and select Edit.
- Select a topic, then select its Guided chat activity. To add one, ask the Workspace Assistant: "Add a guided chat to this topic."
- Under What it teaches, select one option:
- This topic's reading. The tutor teaches the reading and stays inside its facts. The topic's learning goals are the checklist.
- Its own objectives. The tutor teaches up to twelve objectives that you write, in order.
- Optional: write Instructions for the tutor. Give the tone, the examples to use, and what to avoid.
Add guided chats to every reading
- Open Settings, then Learner experience.
- Turn on Auto add guided chats to readings.
- Select Save.
Every topic with a reading then gets a guided chat that teaches it. The setting is on for new courses. A guided chat that you delete is not added back. Turning the setting off removes only the guided chats that the course added and nobody changed.
Give learners a Computer
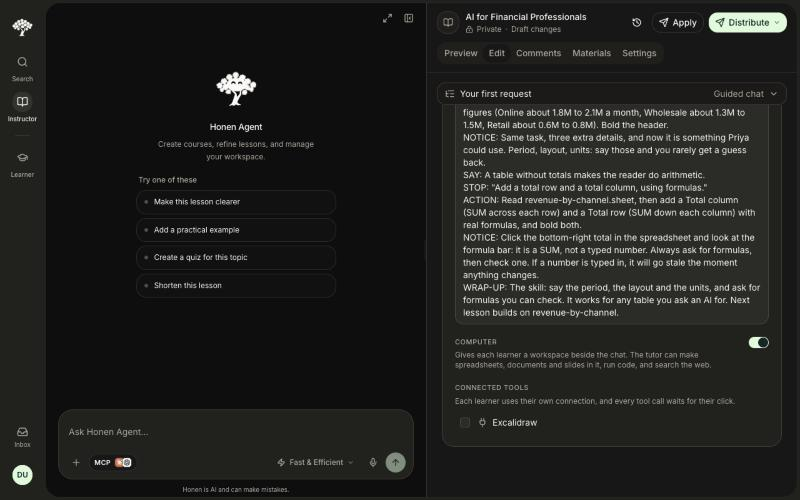
Turn on Computer in the guided chat editor to make the lesson hands-on. Each learner gets a workspace beside the conversation. The tutor can do this work there when the learner asks:
- Make and change spreadsheets, documents, and slide decks. Decks have title, key-number, chart, table, and two-column slides, and download as PowerPoint.
- Build a real app, such as a calculator or a small team tool, that runs on the learner's own machine and shows live beside the conversation. Learners can keep building on it.
- Write and run Python or JavaScript.
- Search the web and name its sources.
The Computer is off unless you turn it on. A guided chat that teaches a reading does not change.
Write the lesson as a script
A hands-on lesson works best when the tutor knows the exact requests the learner must make. Select Its own objectives, then write the instructions as a script. Start each line with one of these words:
| Line | What to write |
|---|---|
SAY: |
One or two lines of setup that the tutor says. |
STOP: |
The exact request the learner makes, in quotation marks. The tutor shows it on a card and waits. |
UPLOAD: |
Asks the learner for a file of their own. Say what to bring, then SAMPLE: and what the tutor should make if they have none. |
ACTION: |
What the tutor does on the Computer after the learner asks: the file, the figures, the formulas. |
NOTICE: |
The one observation the tutor makes afterward. This line carries the teaching. |
WRAP-UP: |
The skill to reuse, and what the next lesson builds on. |
Example:
SAY: Priya asked for revenue by channel. Give me that request word for word.
STOP: "Pull together revenue by channel."
ACTION: Create revenue-vague.sheet with one row of three annual totals and no labels.
NOTICE: No period, no layout, no units. I filled every gap with a guess.
STOP: "Build a table of monthly revenue for January to June, one column for each channel, in US dollars."
ACTION: Create revenue-by-channel.sheet with a header row and six months of figures.
NOTICE: Three extra details, and now the table is usable.
WRAP-UP: State the period, the layout, and the units.
Start the lesson with files already in the Computer
A lesson can come with its material in place. Add starterFiles to the guided chat and each learner's Computer has those files when the lesson opens: a folder of receipts to sort, an export to analyse, a policy to apply.
"starterFiles": [
  { "path": "inbox/receipt-01.txt", "content": "Taxi service\nDate: 2025-03-06\nTotal: $45.36" },
  { "path": "spend.csv", "content": "Category,Amount\nTravel,420\nSoftware,963" }
]
- Text, Markdown, CSV or JSON written in the settings, up to 60 files. A CSV also opens as a spreadsheet.
- Real files work too: a PDF, an image, or a CSV you already have. In the lesson's settings, drop them into Starter files, or ask the course assistant to add an uploaded file to the lesson. They can be up to 8 MB each. A PDF or image is read into text once, so the tutor can work from it, and learners open the file itself.
- Each learner gets each file once. Files they move, rename or sort are not put back.
- Write the first step so it works on the files that are there. Do not ask the learner to have sample data made first.
Give learners a folder of material
The Computer shows its files as icons in folders. Learners can click through folders, open any file, drag files between folders and make new folders.
A lesson can start with a pile to work on. Have the tutor make it in one step, then ask the learner to have it sorted:
SAY: Twenty receipts have landed in your inbox, in no order.
STOP: "Create 20 sample receipts in a folder called inbox."
ACTION: Create 20 receipts as text files in inbox/, across travel, meals, software and office supplies. Leave the category off three of them.
NOTICE: This is what a month of receipts looks like before anyone has touched it.
STOP: "Sort the receipts into folders by category, and rename each one with its date and vendor."
ACTION: Move each receipt into receipts/<category>/ and rename it date-vendor. Put the three with no clear category in receipts/to-review/.
NOTICE: Open the to-review folder. Those three are where your judgment is needed.
The Computer holds up to 200 files.
Let learners use their own files
Add an UPLOAD: step when the lesson works better on the learner's own material.
UPLOAD: A CSV export of last month's expenses, with nothing confidential in it. SAMPLE: 40 expense lines with date, category, vendor type and amount.
The learner sees a card with two buttons:
- Add a file puts their file in the Computer under its own name. A CSV also opens as a spreadsheet. A PDF or an image, such as a receipt or an invoice, opens as it is, and the tutor works from the text read out of it.
- Use a sample has the tutor make the sample you described.
Write the steps after it so they work with either file. Learners can add CSV, TSV, text, Markdown, or JSON files up to 400 KB. Excel files are not supported yet; ask for a CSV export.
Write three to five STOP steps for each lesson. The tutor does not quiz learners in a hands-on lesson.
Share one Computer across the course
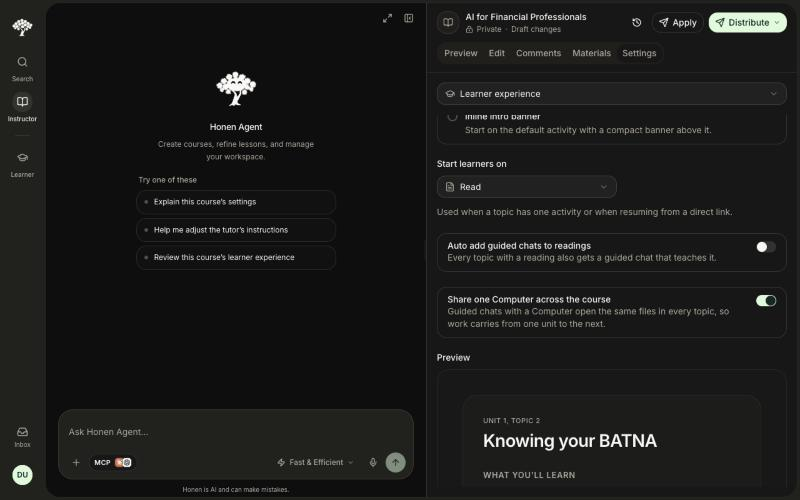
- Open Settings, then Learner experience.
- Turn on Share one Computer across the course.
- Select Save.
Every guided chat in the course then opens the same files, so work carries from one topic and unit to the next. With the setting off, each guided chat has its own Computer.
Use a connected tool
A guided chat can teach learners to use a tool that an MCP server provides.
- Connect the server in your own account first, so that it appears in the editor.
- In the guided chat editor, select the server under Connected tools.
- Write objectives that tell the learner to use the tool.
Each learner uses their own connection to the server and approves every action. If the server provides its own screen, it opens beside the conversation.
Check the lesson
Select Preview to take the guided chat as a learner. A preview conversation works fully but is not saved or counted.